Three-dimensional cardboard volcanoes require more work but the results are more realistic. They require some knowledge of topographic maps. Because the construction of this model requires the use of a razor-blade knife it may not be appropriate for elementary school students.


Mount St. Helens. Photograph courtesy of U.S. Geological Survey.
To make a three-dimensional cardboard volcano you will need:
- a razor-blade knife
- a photocopy of the topographic map of your favorite volcano
- tape or spray glue
- paint (optional)
Step 1. Selecting a Volcano
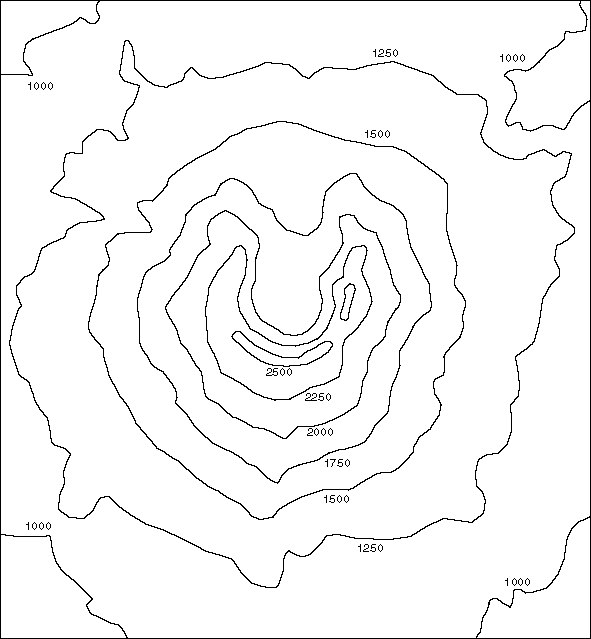
Topographic maps are available for all the volcanoes in the United States. They can be ordered from the U.S. Geological Survey. Many local bookstores and outdoor recreation stores also sell topographic maps. The model made below is from a map published in U.S. Geological Survey Professional Paper 1250 about Mount St. Helens. Click here for a simplified topographic map of Mount Saint Helens. The map shows the volcano after 1980 eruption but before major dome building episodes. Your model could also be made of a favorite volcano or the one that is closest to your home or school.
Step 2. Creating a Pattern.
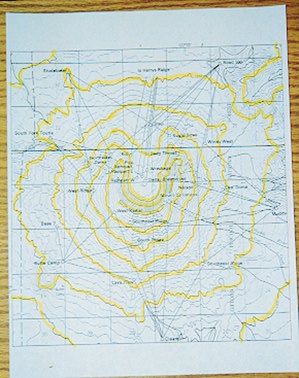
Print the page with the simplified topographic map. This photo shows the original topographic map with specific contours lines (lines of equal elevation) highlighted. The highlighted lines will serve as a simplified topographic map. If you are making your own pattern it is best to make it about 9 or 12 inches on a side. It can be square or rectangular. If needed, enlarge the map to the appropriate size.
Step 3. Cutting Layers. The number of layers (pieces of cardboard) to your volcano depends on the scale (contour interval) of your map and the amount of time you wish to invest in making your model. The yellow lines on the above photo are at intervals of 250 meters going up Mount St. Helens. They adequately show the shape of the mountain and will require 7 layers to be cut (one of each elevation).


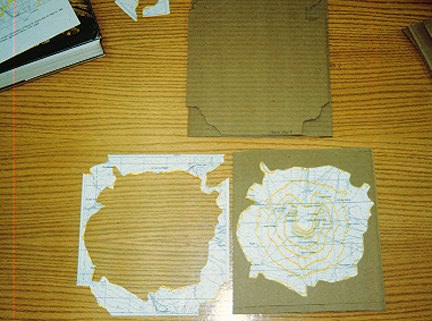
Repeat for each layer.

Stack the layers in order of descending elevation.

By the time you are done you will cut out a pattern for each elevation, trace it on the cardboard, cut it out and stack it. You'll be tired of cutting out cardboard!.

Tape or glue the layers in the appropriate (descending elevation) order. Label the elevation of each layer.

Vertical aerial photograph of Mount St. Helens. Courtesy of Washington Department of Natural Resources.

Notice the crater and the major river valleys cut into the volcano. Compare your model to actual photos of Mount St. Helens. Compare your 3-D map to the original simplified topographic map.